

Here we are writing a program Store in RAM in Atmega32 using ATMEL STUDIO 7 Assembly before that let’s explain what is AVR Memory and Program Memory.
AVR Memory
A modified version of the Harvard Architecture is used to create AVR microcontrollers. This indicates that the Static Random Access Memory (SRAM) and the Flash Program Memory are on different address buses. One data bus can access all data, whereas the other, the In/Out data bus, can only access a tiny portion of memory.
Program Memory
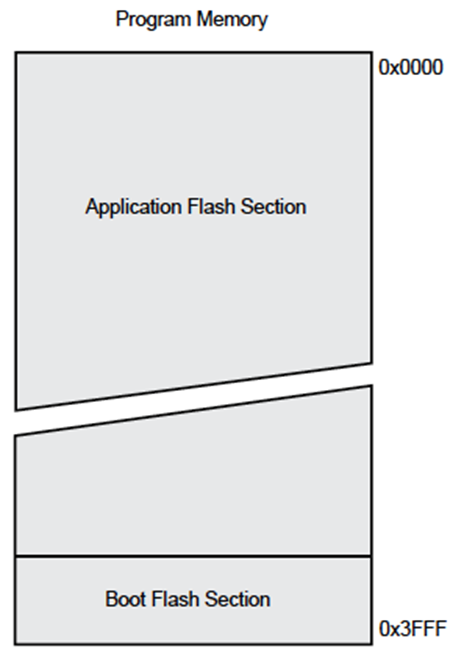
For storing programs, the AVR microcontrollers have on-chip in-system reprogrammable flash memory. The Flash is structured as 32K x 16 since all AVR instructions are either 16 or 32 bits wide. The Flash Program memory space of the device is split into the Boot Loader Section and the Application Program Section for software security purposes. At least 10,000 write/erase cycles may typically be performed on the Flash memory before failure. Using the Load Program Memory (LPM) command, constant tables may be allocated throughout the whole program memory address space. Additionally, there is a library of utilities to facilitate this.
Let us understand it through a program in assembly language.
Firstly, we will include a header file.
CODE:
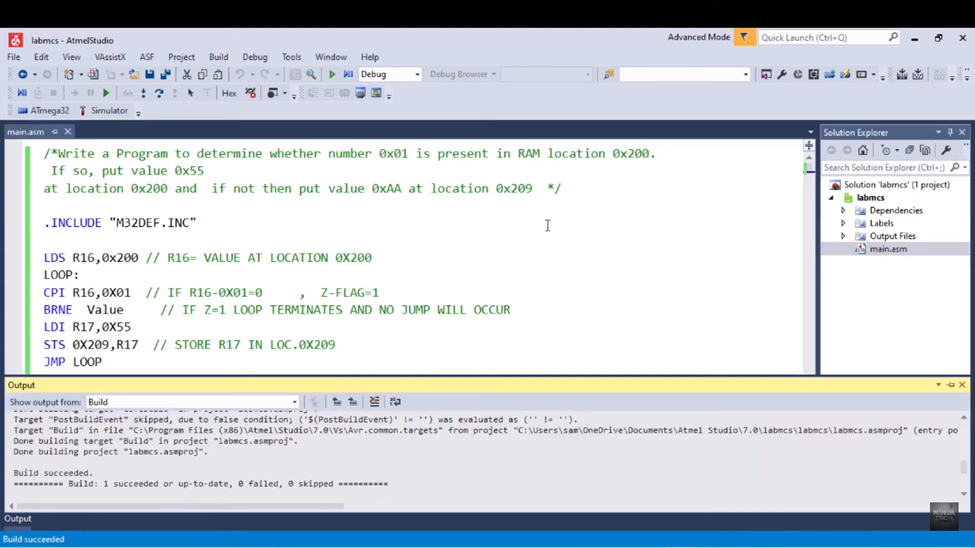
.INCLUDE “M32DEF.INC”
If you do not know how to include it, you can check by clicking here.
To get to know about the labels let’s start by writing a mini instruction.
You first need to know that when you load immediate constant value you use the command of LDI. But when you need to take the value from some location to a general-purpose register you use the command of LDS.
For example, below you can see you are loading the value of the location 0x200 in the general purpose register R16.
LDS R16,0x200 // R16= VALUE AT LOCATION 0X200
Now we are using the loop below. There we used the command of CPI. CPI stands for Compare with Immediate Value. CPI command is used when you compare a constant value and a general-purpose register value.
What the CPI command does is, subtract the value of the general purpose registers with the constant value, if the result is 0 it will raise the Z flag. But if the result is not zero it will not raise the Z flag.
LOOP:
CPI R16,0X01 // IF R16-0X01=0 , Z-FLAG=1
BRNE Value // IF Z=1 LOOP TERMINATES AND NO JUMP WILL OCCUR
Here, if R16 has the value of 1 and when we subtract it from the constant value 1 we will have the value 0 and it will raise the flag. And the condition of BRANCH NOT EQUAL becomes False. And it will terminate the loop and jump to the next command.
LDI R17,0X55
STS 0X209,R17 // STORE R17 IN LOC.0X209
JMP LOOP
STS command is used to store the value in the memory from the general purpose register. Here we first load the value 55 in the general purpose register R17 and then we store that value in the memory. And then we jumped to the loop and in this way, the loop continues to run.
NOTE:
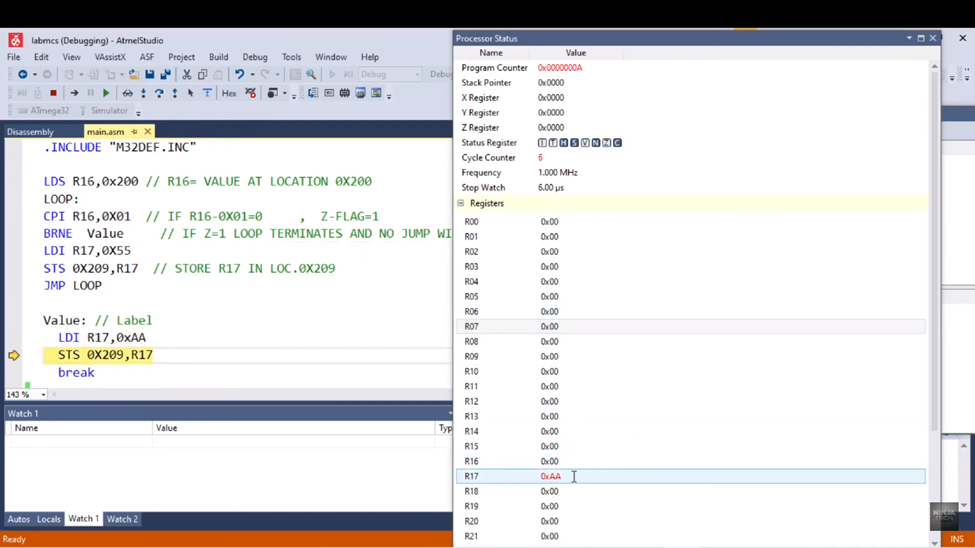
but if the value in the R16 is not 1, we have some other value, which means the result is not zero after subtraction and the condition of BRNE will become true and it will not terminate the loop and jump to the label or the value as given below.
Value: // Label
LDI R17,0xAA
STS 0X209,R17
break
here we load the value AA in the general-purpose register and then store that value into location 209.
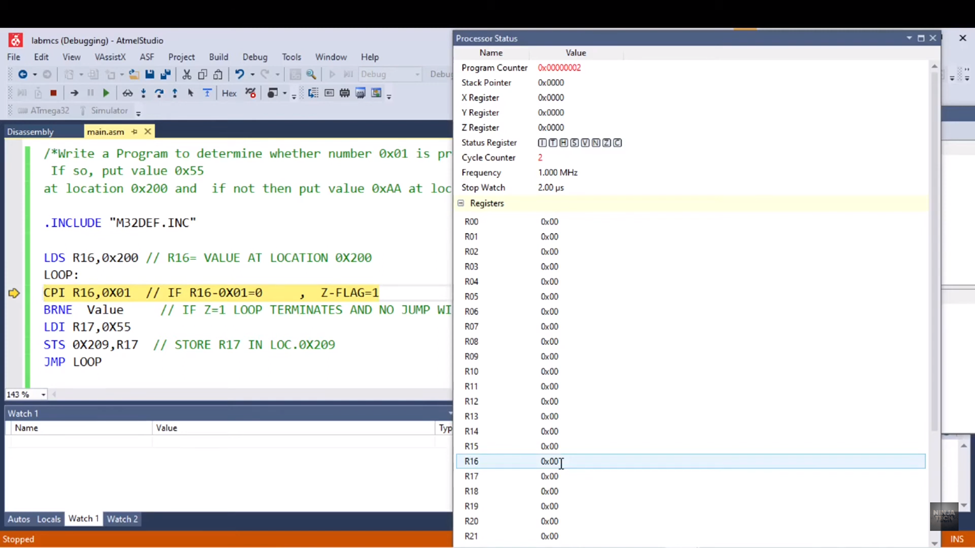
Now we will test our code. First of all, build the code by using the key F7.
The next step is to debug the code. So, by default the value is 0, so have a 0 value in R16and as the value is 0 so flag will not be raised as shown below.

When it jumps to the label it stores the value of AA in the R17.
This is how we can store a value at some memory location.
Conclusion
We have discovered a completely new realm of possibilities in our quest to store data in the RAM of our ATmega32 utilizing ATMEL STUDIO 7 and the Assembly language. RAM serves as the specific location where our little computer, the ATmega32, maintains track of information fast, similar to having a notepad to record essential ideas.
We now know how to communicate with our ATmega32 and instruct it on what to do with data using Assembly language, a form of secret code. By doing so, we may transform our ATmega32 into a helpful little assistant for a variety of purposes.
As we get to the end of our journey, keep in mind how useful it is to know how to use Assembly language to store data in RAM. You can use the ATmega32 to innovate and have fun in limitless ways with a little effort and imagination. Consequently, continue learning and having fun in the fascinating world of microcontrollers and Assembly language!
For Complete Trial Watch the Video: Store in RAM in Atmega32 using ATMEL STUDIO 7 Assembly
For more blogs explore the website: https://ninjatech.live/